
브이로그
2024년 4월 17일 JavaScript-Prototype2 본문
자바스크립트 객체 두 번째 시간이 왔어요~~~~
1. String 객체
String 객체
const str1 = 'JavaScript'
const str2 = new String('JavaScript')
str1 == str2 // true
str1 === str2 // false
<!DOCTYPE html>
<html lang="en">
<head>
    <meta charset="UTF-8">
    <meta name="viewport" content="width=device-width, initial-scale=1.0">
    <title>String 객체</title>
</head>
<body>
    <h2>String 객체</h2>
    <script>
        const str1 = '안녕하세요 JavaScript'
        const str2 = new String('안녕하세요 JavaScript')

        console.log(str1==str2)
        console.log(str1 === str2)
        console.log(typeof(str1))
        console.log(typeof(str2))

        //length: 문자열의 길이를 반환
        console.log(str1.length)

        //indexOf(): 특정 문자나 문자열이 처음으로 등장하는 위치를 인덱스로 반환
        console.log(str1.indexOf('J'))
        console.log(str1.indexOf('Java'))
        console.log(str1.indexOf('java')) // -1
        console.log(str1.indexOf('a'))
        console.log(str1.lastIndexOf('a'))

        // charAt(): 특정 문자열에서 전달받은 인덱스에 위치한 문자를 반환
        console.log(str1.charAt(6))

        // includes(): 특정 문자열에서 전달 받은 문자열이 포함되어 있는지 여부를 반환
        console.log(str1.includes('Java'))
        console.log(str1.includes('java'))

        // substring(): 전달 받은 시작 인덱스부터 종료 인덱스 직전까지의 문자열을 추출채
        console.log(str1.substring(6)) // JavaScript
        console.log(str1.substring(6, 10)) // Java

        // replace(): 원본 문자열의 일부를 전달 받은 문자열로 치환
        console.log(str1.replace('안녕하세요', 'Hell'))

        // split(): 구분자를 기준으로 나눈 후 나뉜 문자열을 하나의 배열에 저장
        const str3 = '김사과, 오렌지, 반하나, 이메론, 베애리, 체리'
        const students = str3.split(',')
        console.log(students)

        for(let i in students){
            console.log(i, students[i])
        }
        console.log('--------------')

        // trim(): 문자열의 앞 뒤 공백을 제거
        const str4 = '                                       Fucking sleep'
        console.log(`🥱${str4}🥱`)
        console.log(`🥱${str4.trim()}🥱`)

        // toUpperCase(), toLowerCase(): 문자열을 모두 대, 소문자로 변환
        console.log(`🥱${str4.trim().toUpperCase()}🥱`)
        console.log(`🥱${str4.trim().toLowerCase()}🥱`)
    </script>
</body>
</html>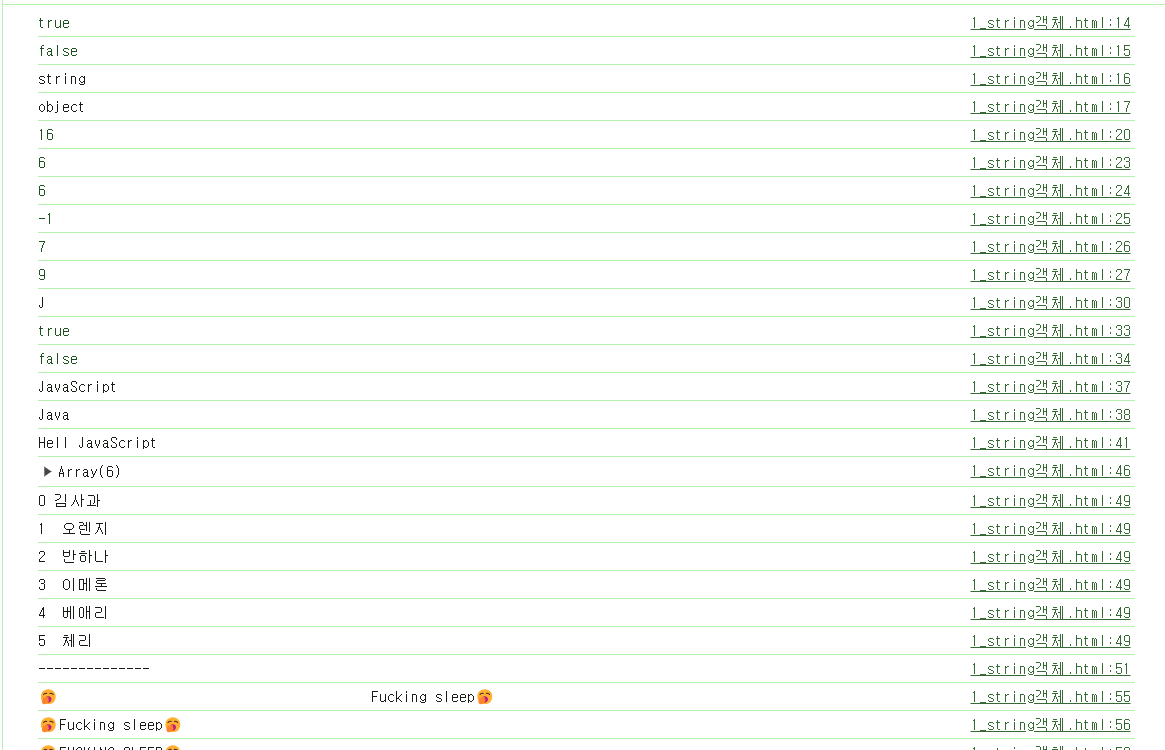
파이썬 문법이랑 비슷한게 많을꺼야
2. Date 객체
Date 객체
날짜, 시간, 등을 쉽게 처리할 수 있는 내장 객체
const 변수명 = new Date() // 현재 날짜 시간
const 변수명 = new Date(년, 월, 일, 시, 분, 초, 밀리초) // 입력한 날짜 시간에 대한 객체
연도(year)
2자리로 표기
예) 23 -> 1923년
4자리로 펴기
예) 2024 -> 2024년
월(month)
0~11
예) 0 -> 1월, 11 -> 12월
<!DOCTYPE html>
<html lang="en">
<head>
    <meta charset="UTF-8">
    <meta name="viewport" content="width=device-width, initial-scale=1.0">
    <title>Date 객체</title>
</head>
<body>
    <h2>Date 객체</h2>
    <script>
        console.log(new Date())
        console.log(new Date(24, 10, 11)) // 1924.11.11
        const current_time = new Date(2024, 3, 17, 9, 51, 0)
        console.log(current_time)
        console.log(`현재 연도: ${current_time.getFullYear()}`)
        console.log(`현재 월: ${current_time.getMonth()}`)
        console.log(`현재 일: ${current_time.getDate()}`)
        console.log(`현재 시간: ${current_time.getHours()}`)
        console.log(`현재 분: ${current_time.getMinutes()}`)
        console.log(`현재 초: ${current_time.getSeconds()}`)

    </script>
</body>
</html>
3. 폼 객체
폼(form) 객체
- 일반적인 폼 요소에 접근할 때 사용
- document.form 컬렉션을 이용해서도 접근이 가능
<form name='myform' id='regfomr' method='post' action='/regist'>
아이디: <input type='text' name='userid' id='userid'><br>
비밀번호: <input type='password' name='userpw' id='userpw'><br>
</form>
폼 접근하기
const frm = document.myform // name접근
const frm = document.forms['myform'] // name접근
const frm = document.forms[0] // 폼 중에서 첫 번째 폼
const frm = document.getElementById('regform') // id접근
아이디 입력상자에 접근하기
const userid = frm.userid // name접근
const userid = document.forms['myform'].elements['userid'] // name
const userid = document.forms[0].elements[0]
const userid = document.forms[0][0]
const userid = document.getElementById('userid') // id
<!DOCTYPE html>
<html lang="en">
<head>
    <meta charset="UTF-8">
    <meta name="viewport" content="width=device-width, initial-scale=1.0">
    <title>폼 객체</title>
</head>
<body>
    <h2>폼 객체</h2>
    <form action="/regist" name="frm1" id="frm1">
        <input type="text" name="userid" id="userid" placeholder="아이디를 입력하세요"><br>
        <input type="password" name="userpw" id="userpw" placeholder="비밀번호를 입력하세요">
    </form>

    <form action="/search" name="frm2" id="frm2">
        <input type="search" name="search" id="search" placeholder="검색어를 입력하세요">
        <button type="button" onclick="sendit()">확인</button>
    </form>

    <script>
        const frm1 = document.frm1
        console.log(frm1)
        console.log(frm1.userid.placeholder)
        document.getElementById('userid').value = 'apple'
        document.forms['frm1'].elements['userpw'].value = '1004'

        // frm2의 search에 있는 placeholder를 콘솔에 출력
        // frm2의 search를  forms 컬렉션의 인덱스로 찾아 search 요소에 '코리아IT아카데미'를 입력

        const frm2 = document.frm2
        console.log(frm2.search.placeholder)
        document.getElementById('search').value = '코리아IT아카데미'

        function sendit(){
            alert('확인을 눌렀어요')
        }
    </script>
</body>
</html>

각각 아이디와 비밀번호로 접근을 해서 밸류값을 넣어주는거야 -> 입력상자
4. window 객체
4-1. setTImeout
window 객체
웹 브라우저의 창이나 탭을 설정하기 위한 객체들이며, 웹 브라우저는 window 객체를 이용하여 브라우저 창을 표현
모든 내장객체의 최상위 객체
window 객체
document forms location ...
window.alert()
window.confirm()
window.prompt()
setTimeout()
일정 시간이 지난 후 매개변수로 제고된 함수를 실행
const 변수명 = function(){
...
}
const st = setTimeout(변수명, 밀리초)
clearTimeout()
일정 시간 후에 일어날 setTimeout()을 취소함
setInterval()
일정 시간마다 매개변수로 제공된 함수를 실행
clearInterval()
일정시간마다 일어날 setInterval()을 취소함
현재 시간을 출력한ㄴ 문서르 만들어보자
(단, 시작 버튼을 누르면 콘솔에 시간을 초마다, 출력을 중지 버튼을 누르고 시간)
<!DOCTYPE html>
<html lang="en">
<head>
    <meta charset="UTF-8">
    <meta name="viewport" content="width=device-width, initial-scale=1.0">
    <title>setTimeout</title>
</head>
<body>
    <h2>setTimeout</h2>
    <script>
        const hell = function(){
            alert('안녕히가세요 JavaScript')
        }

        const st = setTimeout(hell, 5000) // 5초
        clearTimeout(st)
    </script>
</body>
</html>
5초 있다가 문구가 나오게 해주는거야 그리고 밑에 clear는 평생 안나오게 해주는거지
4-2. setInterval
<!DOCTYPE html>
<html lang="en">
<head>
    <meta charset="UTF-8">
    <meta name="viewport" content="width=device-width, initial-scale=1.0">
    <title>setInterval</title>
</head>
<body>
    <h2>setInterval</h2>
    <script>
        const hell = function(){
            console.log('오지마세요. JavaScript')
        }

        const si = setInterval(hell, 3000)

        const clearInter = function(){
            clearInterval(si)
            console.log('hell()이 중지되고 있습니다')
        }
    </script>
    <p><button onclick="clearInter()">중지</button></p>


</body>
</html>
3초마다 콘솔창에 문구가 나오는게 '중지'버튼을 눌렀을 때 멈추게 하는거야
4-3. 시간계산
 <!DOCTYPE html>
 <html lang="en">
 <head>
    <meta charset="UTF-8">
    <meta name="viewport" content="width= , initial-scale=1.0">
    <title>시간</title>
 </head>
 <body>
    <h2>시간</h2>
    <script>
        const current_time = function(){
            console.log(new Date())
        }
        const time = setInterval(current_time, 1000)

        const setInter = function(){
            setInterval(time)
            console.log('시작되었습니다.')
        }

        const clearInter = function(){
            clearInterval(time)
            console.log('중지되었습니다')
        }

    </script>
    <p><button onclick="setInter()">시작</button></p>
    <p><button onclick="clearInter()">중지</button></p>

    <script>
        function makeClick(){
            const date = new Date()
            yy = date.getFullYear()
            MM = date.getMonth()
            dd = date.getDate()
            hh = date.getHours()
            mm = date.getMinutes()
            ss = date.getSeconds()
            console.log(`${yy}-${MM}-${dd}-${hh}-${mm}-${ss}`)
        }

        let si

        function startClock(){
            si = setInterval(makeClick, 1000)
        }

        function stopClock(){
            clearInterval(si)
            console.log('종료')
        }
    </script>
    <button onclick="startClock()">시작</button>
    <button onclick="stopClock()">중지</button>
 </body>
 </html>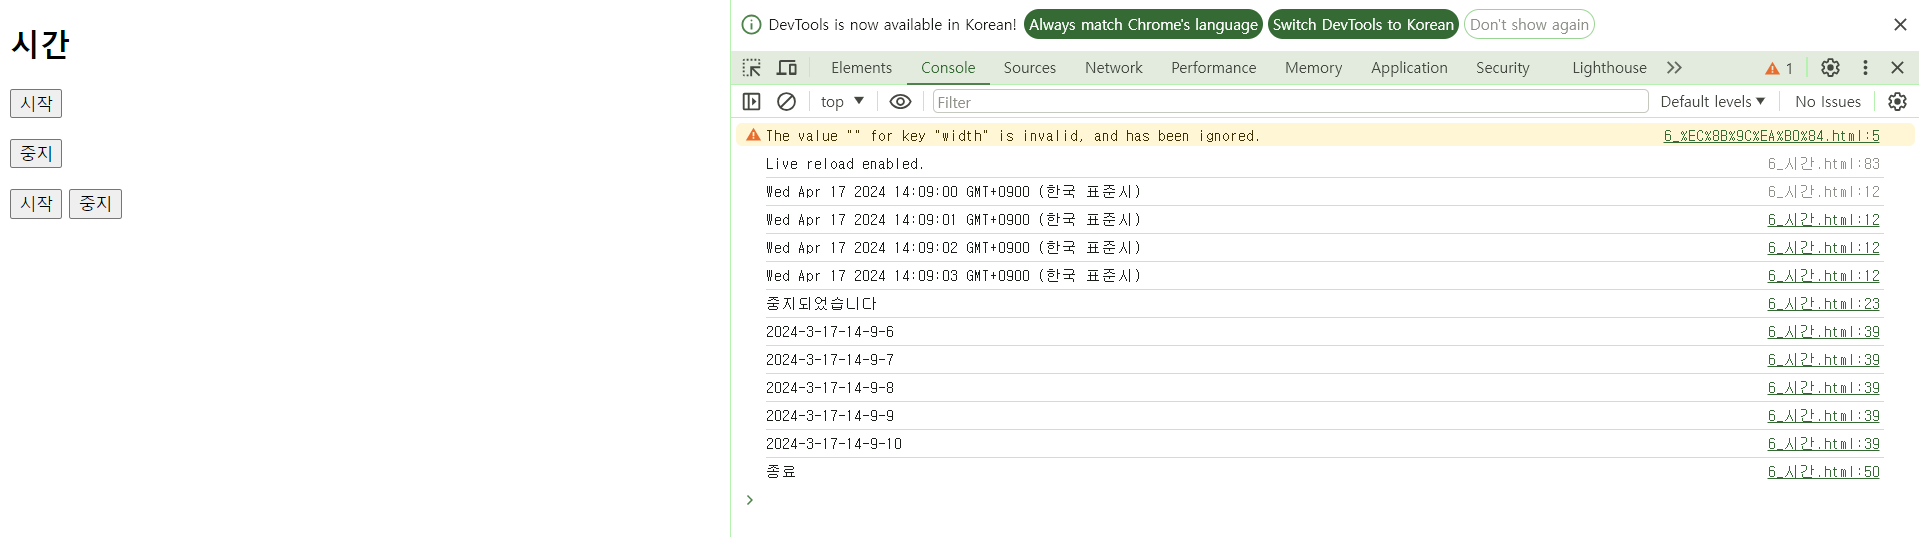
두 가지 방법으로 현재시간을 뽑아봤어
5. location객체
location 객체
현재 브라우저에 표시된 HTML 문서의 주소를 얻거나, 브라우저에 새 문서를 불러올 때 사용
https://koreaisacademy.com/community/tv_view.asp?idxnum=198&clkMater=&txtMenu=&txtCurPage=1&selMater=&gubun=1
URL
https://koreaisacademy.com/community/tv_view.asp
Protocal: 콜론을 포함하는 http, https, ftp 등 프로토콜 정보를 반환
예) https://
hostname: 호스트의 이름과 포트번호를 반환
예) https://koreaisacademy.com/
pathname: URL 경로부분을 반환
예) /community/tv_view.asp
href: 페이지 URL 전체 정보를 반환 또는 URL을 지정하여 페이지를 이동시킴
reload(): 새로고침
<!DOCTYPE html>
<html lang="en">
<head>
    <meta charset="UTF-8">
    <meta name="viewport" content="width=device-width, initial-scale=1.0">
    <title>loaction 객체</title>
</head>
<body>
    <h2>location 객체</h2>
    <script>
        function pageInfo(){
            console.log(`현재 문서의 URL주소: ${location.href}`)
            console.log(`현재 문서의 URL주소: ${location.href}`)
            console.log(`현재 문서의 hostname: ${location.hostname}`)
            console.log(`현재 문서의 pathname: ${location.pathname}`)
        }

        function sendit(){
            location.href = 'https://python.org'
        }
    </script>
    <p><button onclick="pageInfo()">페이지 정보</button></p>
        <button onclick="sendit()">이동하기</button>
        <button onclick="location.reload()">새로고침</button>
</body>
</html>
페이지 정보를 눌렀을 때 나오는 정보고 밑에 사이트를 넣어주고 나서 이동하기 버튼을 눌러주면 해당 사이트로 이동하고
새로고침을 하면 처음으로 돌아가는거지(콘솔창만)
6. history 객체
history 객체
- 브라우저의 히스토리 정보를 문서와 문서상태 목록으로 저장하는 객체
- 사용자의 개인 정보를 보호하기 위해 이 객체의 대부분의 기능을 제한
back(): 페이지를 뒤로 이동시킴
forward(): 페이지를 앞으로 이동시킴
go(0): 새로고침, location.reload()와 같은 기능
<!DOCTYPE html>
<html lang="en">
<head>
    <meta charset="UTF-8">
    <meta name="viewport" content="width=device-width, initial-scale=1.0">
    <title>history 객체</title>
</head>
<body>
    <h2>history 객체</h2>
    <button onclick="history.back()">뒤로</button>
    <button onclick="history.forward()">앞으로</button>
    <button onclick="history.go(0)">새로고침</button>
</body>
</html>


어느 사이트를 들어가면 위 화면 처럼나오는데 여기서 뒤로가기 (왼쪽위 화살표)를 해주면 다시 원래대로 돌아오고
앞으로 버튼을 누르면 다시 사이트 화면으로 넘어가고 새로고침 버튼을 누르면 새로고침이 되고
7. navigator 객체
navigator 객체
브라우저 공급자 및 버전 정보 등을 포함한 브라우저에 대한 정보를 저장하는 객체
geolocation: GPS정보를 수신하는 프로퍼티
<!DOCTYPE html>
<html lang="en">
<head>
    <meta charset="UTF-8">
    <meta name="viewport" content="width=device-width, initial-scale=1.0">
    <title>navigator</title>
</head>
<body>
    <h2>navigator</h2>
    <script>
        const success = function(loc){
            console.log(loc.coords.latitude)
            console.log(loc.coords.longitude)
        }
        const fail = function(msg){
            console.log(msg.code)
        }
        navigator.geolocation.getCurrentPosition(success, fail)
    </script>
</body>
</html>
위 코드를 실행시켜주면 쿠키허용? 처럼 허용하는 문구가 뜨는데 허용을 해주면 현 위치를 기준으로 해서 위도와 경도가 나오게되는데 정확한 위치는 아닌거같아
8. 문서 객체
document 객체
- DOM(Document Object Model)
- HTML문서 또는 XML문서 등을 접근하기 위한 일종의 인터페이스 역할
- 문저내의 모든 요소를 정의하고 각각의 요소에 접근하는 방법을 제공된
- 웹 페이지 자체(body)를 의미하는 객체
- 웹 페이지에 존재하는 HTML 요소에 접근하고자 할 때 반드시 document 객체로부터 시작
getElementById(): 해당 아이디의 요소를 선택
getElementsByTagName(): 해당 태그 이름의 요소를 모두 선택
getElementByClassName(): 해당 클래스에 속한 요소를 모두 선택
getElementsByName(): 해당 name 속성값을 가지는 요소를 모두 선택
querySelectorAll(): 선택자로 선택되는 요소를 모두 선택
querySelector(): 선택자로 선택되는 요소를 선택
<!DOCTYPE html>
<html lang="en">
<head>
    <meta charset="UTF-8">
    <meta name="viewport" content="width=device-width, initial-scale=1.0">
    <title>문서 객체 모델</title>
</head>
<body>
    <h2>문서 객체 모델</h2>
    <ul>
        <li name="markup">HTML</li>
        <li>CSS</li>
        <li id="JavaScript" class="js">JavaScript</li>
        <li class="js">React</li>
        <li class="backend">Apache</li>
        <li class="backend">NgineX</li>
        <li id="nodejs" class="js">Node.js</li>
        <li id="vue" class="js">Vue</li>
    </ul>
    <script>
        const tagName = document.getElementsByTagName('li')
        for(let i=0; i<tagName.length; i++){
        console.log(tagName[i])
        tagName[i].style.color = 'gold'
    }

    console.log('---------------------')

    const className = document.getElementsByClassName('js')
        for(let i=0; i<className.length; i++){
        console.log(className[i])
        className[i].style.color = 'deeppink'
    }

    console.log('---------------------')

    const id = document.getElementById('JavaScript')
    console.log(id)
    id.style.color = 'greenyellow'


    const name = document.getElementsByName('markup')
    for(let i=0; i<name.length; i++){
        console.log(name[i])
        className[i].style.color = 'deepskyblue'
    }

    console.log('---------------------')

    const  qsa = document.querySelectorAll('li.backend')
    for(let i=0; i<qsa.length; i++){
        console.log(qsa[i])
        className[i].style.color = 'navy'
    }
    </script>
</body>
</html>
8-1. 문서 객체
<!DOCTYPE html>
<html lang="en">
<head>
    <meta charset="UTF-8">
    <meta name="viewport" content="width=device-width, initial-scale=1.0">
    <title>문서객체 모델</title>
    <script>
        window.onload = function(){
            const gnb = document.getElementById('gnb')
            console.log(gnb)

            console.log(gnb.parentNode)
            console.log(gnb.children[0])
            console.log(gnb.children[1])
            console.log(gnb.children[0].children[0])
            console.log(gnb.children[0].children[1])
            console.log(gnb.children[0].children[0].nextElementSibling)
            console.log(gnb.children[0].firstChild) // text 출력 띄어쓰기를 하면 텍스트로 인지
            console.log(gnb.children[0].firstElementChild)
        }
    </script>
</head>
<body>
    <h2>문서 객체 모델 </h2>
    <div>
        <nav id="gnb">
            <ul>
                <li>내용1</li>
                <li>내용2</li>
                <li>내용3</li>
            </ul>
        </nav>
    </div>
</body>
</html>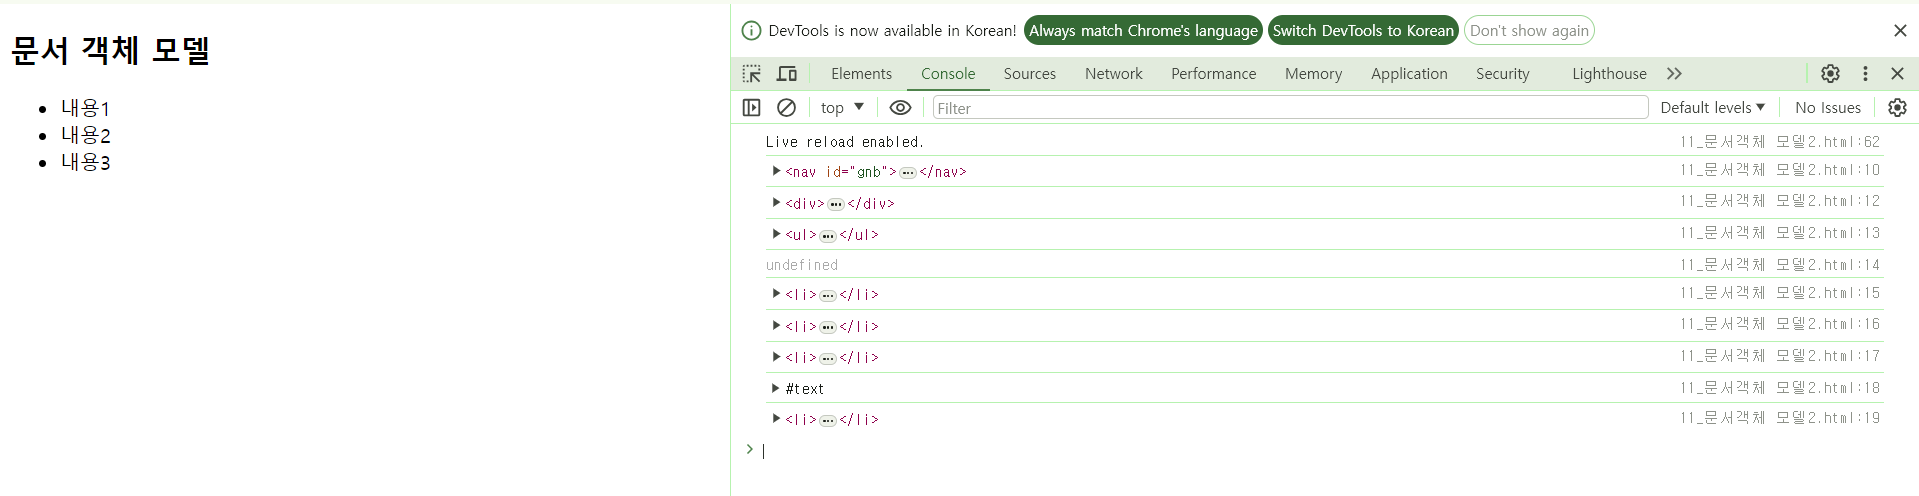
9. 노드 객체
노드(node)
HTML DOM은 노드라고 불리는 계층적 단위에 정보를 저장
노드 종류
문서 노드: 문서 전체를 나타내는 노드
요소 노드: HTML 모든 요소는 요소노드이며, 속성노드를 가질 수 있음
속성 노드: HTML 모든 요소는 속성노드이며, 속성노드에 관한 정보를 가지고 있음
텍스트 노드: HTML 모든 텍스트는 텍스트노드
주석 노드: HTML 모든 주석은 주석 노드
노드의 관계
parentNode: 부모 노드
children: 자식 노드
childNodes: 자직 노드 리시트
firstChild: 첫 번째 자식 노드
firstElementChild: 첫 번째 자식 요소 노드
lastChild: 마지막 자식 노드
nextSibling: 다음 형제 노드
previousSbiling: 이전 형제 노드
<!DOCTYPE html>
<html lang="en">
<head>
    <meta charset="UTF-8">
    <meta name="viewport" content="width=device-width, initial-scale=1.0">
    <title>노드메소드</title>
</head>
<body>
    <h2>노드메소드</h2>
    <script>
        function appendNode(){
            const parent = document.getElementById('list')
            console.log(parent)
            const newItem = document.getElementById('item1')
            console.log(newItem)
            // appendChild(): 새로운 노드를 해당 노드의 자식 노드 리스트 맨 마지막에 추가
            parent.appendChild(newItem)
        }

        function insertNode(){
            const parent = document.getElementById('list')
            const backend = document.getElementById('backend')
            const newItem = document.getElementById('item2')
            // insertBefore(): 새로운 노드를 특정 자식 노드 바로 앞에 추가
            parent.insertBefore(newItem, backend)
        }

        function appendText(){
            const text = document.getElementById('text').firstChild
            console.log(text)
            // 새로운 노드를 텍스트 데이터로 추가
            text.insertData(7, '아주 피곤한 수요일 ')
        }

        function createNode(){
            const newItem = document.getElementById('item1')
            // createElement(): 새로운 요소가 노드를 만듦
            const newNode = document.createElement('p') // <p></p>

            //<p><strong>🥱새로운 요소가 추가됨</strong></p>
            // innerHTML: HTML요소와 텍스트를 삽입
            // innerText: 텍스트만 삽입
            newNode.innerHTML = '<strong>🥱새로운 요소가 추가됨</strong>'
            document.body.insertBefore(newNode, newItem)
        }

        function createAttr(){
            const newItem = document.getElementById('item2')
            // createAttribute(): 새로운 속성 노드를 만듦
            const newAttr = document.createAttribute('style')
            // style = 'color:deeppink; background-color:gold'
            newAttr.value = 'color:deeppink; background-color:gold'
            // <p id="item2" style = 'color:deeppink; background-color:gold;' >React</p>
            newItem.setAttributeNode(newAttr)
        }

        function createText(){
            const textNode = document.getElementById('ct')
            // createTextNode(): 새로운 텍스트 노드를 만듦
            const newText = document.createTextNode('😀😁😁😂🤣😃😄😎')
            textNode.appendChild(newText)
        }

        function removeNode() {
            const parent = document.getElementById('list')
            const removeItem = document.getElementById('backend')
            // removeChild(): 자식 노드 리스트에서 특정 자식 노드를 제거
            // 노드가 제거되면 해당 노드를 반환
            // 노드가 제거될 때 노드의 자식들도 다같이 제거
            const result = parent.removeChild(removeItem)
            console.log(result)
        }

        function removeAttr(){
            const newItem = document.getElementById('item2')
            // removeAttribute(): 특정 속성 노드를 제거
            newItem.removeAttribute('style')
        }

        function cloneElement(){
            const parent = document.getElementById('list')
            const originItem = document.getElementById('cl')
            // cloneNode(): 기존에 존재하는 노드와 동일한 새로운 노드를 생성하여 반환
            // (true: 자식까지 복사, false:자식은 복사하지 않음)
            parent.appendChild(originItem.cloneNode(true))
        }
    </script>
    <h2 id="cl">노드</h2>
    <div id="list">
        <p id="backend">node.js</p>
        <p>HTML</p>
        <p>CSS</p>
    </div>
    <p id="item2">React</p>
    <p id="item1">JavaScript</p>
    <hr>
    <p id="text">현재 시간은 오후 3시</p>
    <button onclick="appendNode()">노드추가1</button>
    <button onclick="insertNode()">노드추가2</button>
    <button onclick="appendText()">텍스트노드추가</button>
    <hr>
    <p id="ct"></p>
    <hr>
    <button onclick="createNode()">노드생성</button>
    <button onclick="createAttr()">속성노드생성</button>
    <button onclick="createText()">텍스트노드생성</button>
    <hr>
    <button onclick="removeNode()">노드삭제</button>
    <button onclick="removeAttr()">속성노드삭제</button>
    <hr>
    <button onclick="cloneElement()">노드복제</button>
</body>
</html>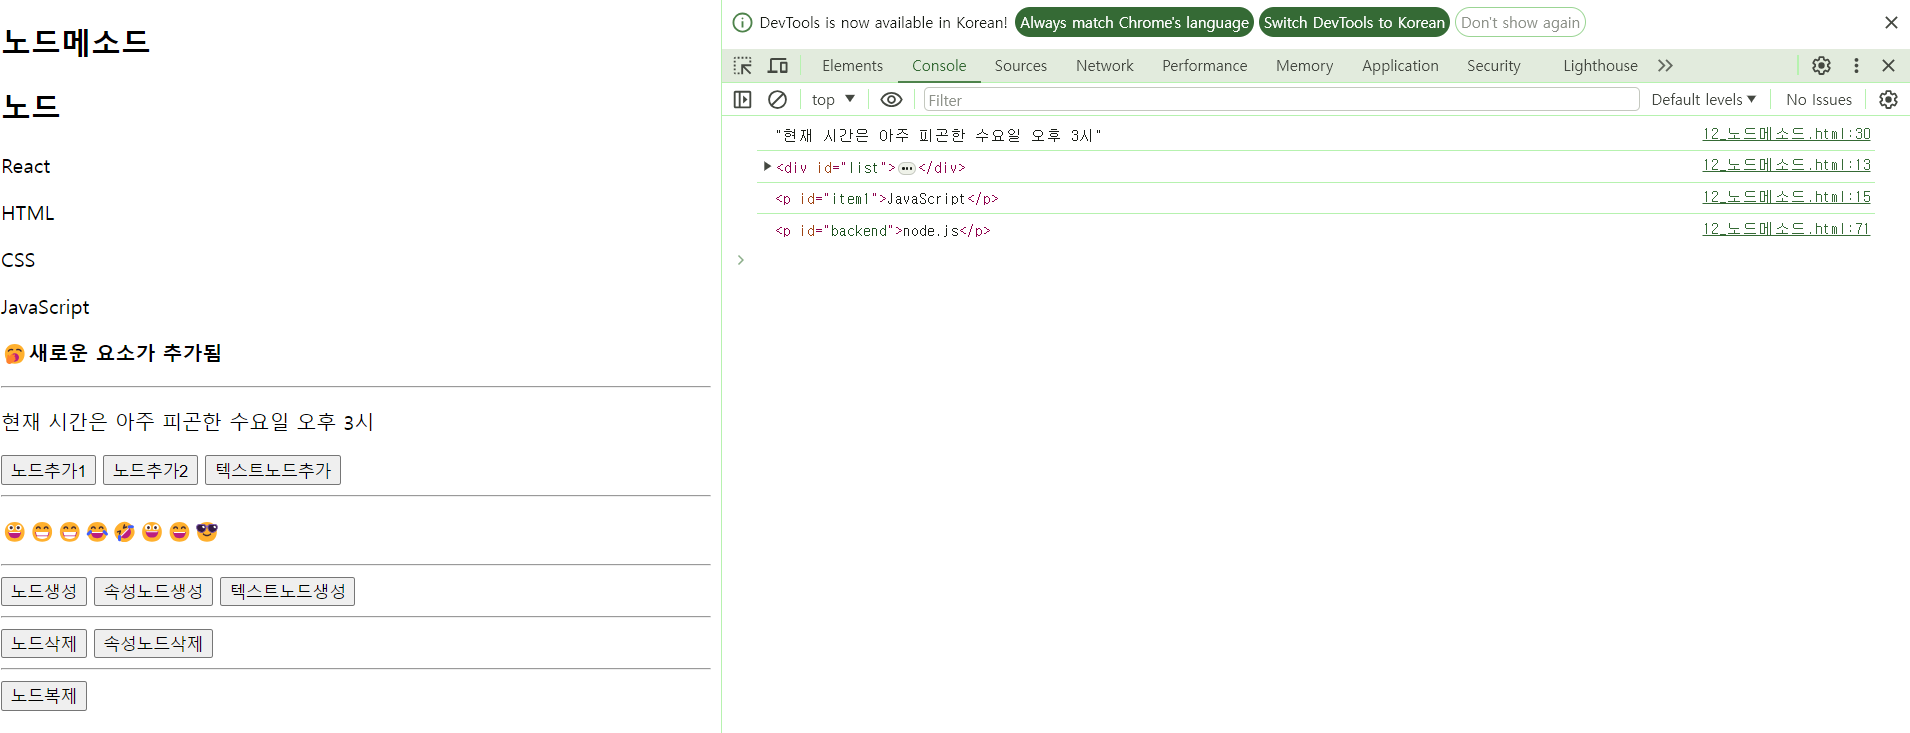
수많은 객체를 만들면서 어떤 기능들이 있는지 알아봤어
'JavaScript' 카테고리의 다른 글
| 2024년 4월 18일 JavaScript-Regular Expression (1) | 2024.04.18 |
|---|---|
| 2024년 4월 16일 JavaScript-Game (0) | 2024.04.16 |
| 2024년 4월 16일 JavaScript-Prototype (0) | 2024.04.16 |
| 2024년 4월 16일 JavaScript-Object (0) | 2024.04.16 |
| 2024년 4월 16일 JavaScript-Function (0) | 2024.04.16 |


